Monday, October 31, 2011

Fall Craft #4: Does Your MUMMY Know It's Halloween??

Bottle Mummy
Materials:
  • Dish soap bottle
  • Toilet paper
  • Glue
  • 2 wiggly eyes (we chose two different ones)
  • Paint brush

Directions:

Mix glue with a bit of water to thin it out. "Paint" the glue all over the bottle.


Wrap the toilet paper around the bottle. This will require adult assistance.


Glue two eyes on to the mummy. We did one big orange eye and one smaller purple eye to make it fun.


And here's our completed mummy!


Here's a picture of a mummy in one of our Halloween books, to use as inspiration. My daughter didn't understand at first that we were making a "mummy" and not a "mommy." 


From The Night Before Halloween by Natasha Wing

Thursday, October 27, 2011

Our Learning Environment

Before Lydia was born, we created a pretty typical baby nursery ~ crib, glider w/ottoman, toy box, mobile, rug, etc. Well, I just scrolled through the 9000+ photos on my computer, and I cannot find one of her nursery. That should tell you how infrequently we used it. Lydia never slept in her crib, and it was recalled about a year ago. So, when we started to plan for Bryce's bedroom, we decided to make a toddler room. Right now, it basically serves as a classroom and playroom for the two of them. We wanted to go with bold, primary colors (see the colors used in this blog??) and we chose a space theme.


We have a toddler-sized table and chair set with a cool outer space rug below. The 4 bins on the side store different puzzles.

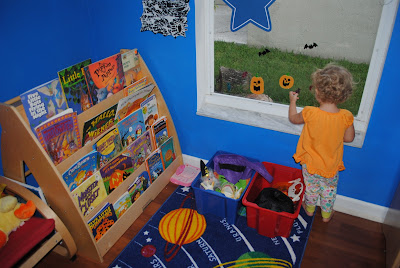
We have a library with books to fit each month's holidays or a particular theme. 


We have lots of storage for all of our learning toys, building blocks, and pretend play toys. I'm always looking for new ways to organize the room and new toys to add to our collection. I generally choose toys that combine imagination and learning. Lydia seems to love those, too!

So, that's our learning environment! Feel free to share ideas for creating a learning environment, for age-appropriate toddler toys, etc. I am always ready to learn more!

Wednesday, October 26, 2011

REMINDER: There are no rules to toddler play

I had to remind myself of something today. There are no rules to toddler play. Now, obviously, I don't want my daughter playing with a real stove or running around the house with a pair of scissors. She shouldn't throw her toys or hit people with them. But when it comes to imagination - there should be no limitations.

Let me preface the following by saying I tend to be kinda anal retentive. (My friends are probably thinking "Kinda?!")

So what made me think of this? Well, Lydia was playing with her Duplo blocks today. She had a set with different zoo animals. When she played independently, all she did was stack them all vertically. I sat down to play with her, and we made a zoo together. I got out the flat green base to build on, I placed the entrance to the zoo on one side of the green base, and I began to make different areas for each animal. The elephant had grass, the giraffe had trees, the lion had a tall wall so it couldn't escape, and the polar bear was surrounded by white and blue blocks to look like ice...er...until Lydia put an off-white block, a tan block, an orange block, an eye block, etc. WHAT?! Tan and orange are not ice-looking colors. Polar bears are not found in areas with those colors. What is she doing??


Oh, right, she's 2 years old. She's doing what 2 year-olds are supposed to do - Being creative! She's using her imagination, without limitations. While age may teach us to be more artistic as we learn to draw, paint, sculpt, etc. better, age also limits our imaginative creativity. Lydia doesn't know that polar bears live in the snow and snow is generally white, so the polar bear area in our fictitious plastic zoo should be white. She doesn't have those boundaries. Her play goes beyond what we know to be true. Why should my knowledge of "facts" and "rules" limit her endless imagination? It shouldn't.

So when Lydia laid the cookies on the pan out of "order" (you know, from left to right in rows), I had to stop myself again. Her cookies can go in any order. She doesn't have to worry about them touching one another while cooking or not being able to fit the entire batch on a sheet pan. She's pretending to make cookies. This doesn't even require a pan or objects that even resemble cookies.


For us parents who often limit our thoughts to those that are more concrete...

REMINDER: There are no rules to toddler play!

Tuesday, October 25, 2011

My 1st Post ~ A Dedication

I want to dedicate this blog to a very special little girl. Her name is Melissa, and I hope that her mom doesn't mind me writing about her. Melissa is a student at the school where I work as co-director, Abi's Place. The school opened its doors in August 2008, and Melissa was one of the first students there. Melissa is a child with special needs. I remember when she started at Abi's Place, her mom wanted one thing - handprint artwork! Melissa used to cross her arms and tuck her hands in all the time. She would get nervous, and as a result, she didn't want to open her hands up. We made it our mission that year to get some beautiful handprint artwork for her mom Dina to display. I believe it was probably around Christmas time that we were finally able to get her to trust us, open her hands to put paint all over them, and create some awesome handprint art for her mother!


So, Melissa & Dina, I dedicate "Busy Lil' Hands" to you two!


Melissa's hands exploring a pumpkin.

Thursday, October 20, 2011

Fall Craft #3: Our Upcycled Pumpkin Patch

by Carrie Wells, Ed.D.

Inspired by a contest hosted by Green Toys, Lydia and I created an Upcycled Pumpkin Patch! 


Because Green Toys are made of recycled milk jugs, they are hosting a contest where participants must convert milk jugs into pumpkins. We began by pouring orange craft paint into a 1/2 gallon milk jug. Lydia had to shake, shake, shake to distribute it all. 


The next day, we looked around the house for more orange items to turn into pumpkins. We found a small lotion container, a tray from sausages, a basketball, and a food basket. I cut out all different shapes to glue to our "pumpkins." Lydia did the gluing. 


With such beautiful fall weather this morning, we gathered all the "pumpkins" (and one real pumpkin) and brought them into the backyard. I happen to have a cantaloupe vine growing that looks like a pumpkin vine...although any big leafy plant would do. We placed all of our pumpkins near the vine so that it looks like a pumpkin patch!


And that's our upcycled pumpkin patch!


I even got inspired to make one more silly "pumpkin" with a slice of pretend cheese... So much fun!

After, I thought it was only appropriate to watch It's the Great Pumpkin, Charlie Brown

Saturday, October 1, 2011

Guidecraft Educator Review #3 ~ Universal Book Display & Storage

by Carrie Wells, Ed.D.

This month, the Guidecraft Educators are reviewing the Universal Book Display & Storage. This two-sided bookcase has storage space for standard-sized board books, paperback books, and hardcover books on one side and storage space for big books on he other side. What I love most about this book storage is that it is not just a traditional bookcase where you just see the binding of the books. This book storage allows you to display the entire cover of the book, which is a great way to entice early learners! They love to look at the colorful illustrations on the front of each book.

The Universal Book Display & Storage is constructed of sturdy birch ply wood and weighs 40 pounds. It took approximately a half-hour to assemble. This book storage goes very nicely with the Guidecraft Nordic Rocker I reviewed in August. Here are some pictures of our library.

I like to change the books in my children's library each month based on the season/holiday or a given theme. This month's theme is Fall/Halloween. I was able to display 22 books. Next to the book storage, I placed two bins of themed items to explore before, during and after reading. One bin has synthetic fall leaves and wiggly creatures (plastic bugs and spiders). The other bin has some Halloween plush characters, like a wizard, witch, and frog. Because of the neutral design and color, I am able to 'dress up' the book display & storage to go with the theme as well. We are going to add some spider webs later.


BUY IT! You can purchase this well-designed, two-sided Guidecraft Universal Book Display & Storage for your  home or classroom library for just $200.

WIN IT! What's great about this Guidecraft Educator group is that each month, one of us will be hosting a giveaway of the product that we have all reviewed. Visit Mommy PR for a chance to win a Universal Book Display & Storage for your child. This contest is open to the US and Canada. 

* I received the aforementioned product for free to review. The opinions expressed are honest and provided without monetary compensation.